We offer Australian customers easy 30 day exchanges, so there's no risk to you.
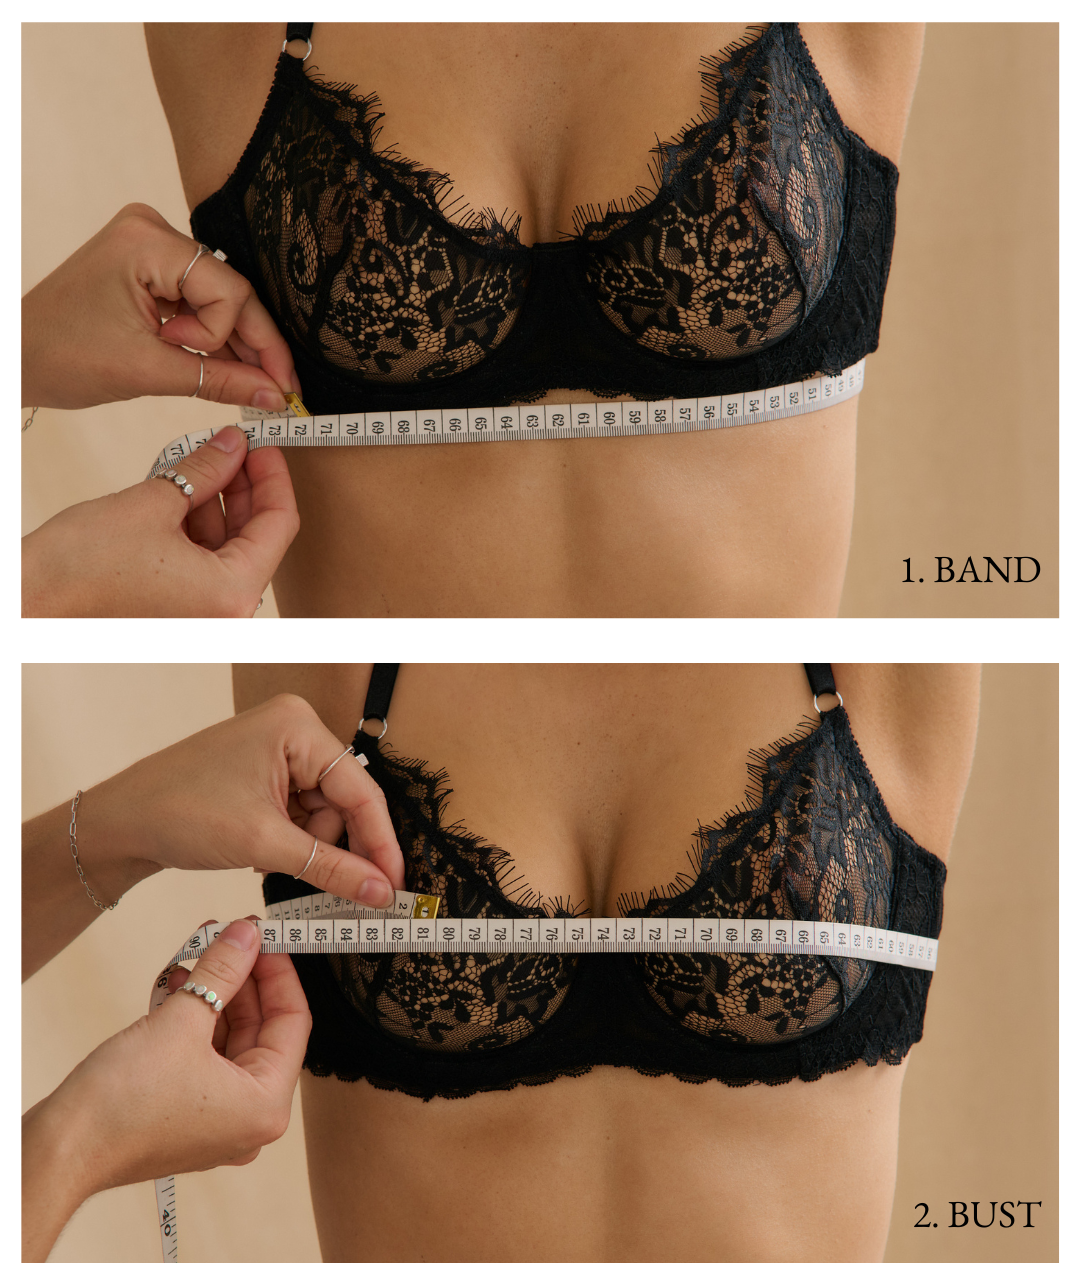
Underwire Conversion Chart
Select your band size along the top, and cup size down the side to find the best fit.
| FR/SP/BG | 80 | 85 | 90 | 95 | 100 |
| EU/CH/JP/ HK/KO |
65 | 70 | 75 | 80 | 85 |
| USA/UK/IN | 30 | 32 | 34 | 36 | 38 |
| AU/NZ | 8 | 10 | 12 | 14 | 16 |
| AA | XS | ||||
| A | XS | XS | S | ||
| B | XS | S | M | ||
| C | S | M | M | L | |
| D | M | M | L |
|
|
| DD | 2S | L | XL |
|
|
| E | 2S | 2S |
|
|
3X |
| F | 2S | 2S | 2X |
|
3X |
| G | 3X |
For specific size advice please reach out to our customer care team, just like our bras, we're here to support you!
Unsure about your size?
We offer Australian customers FREE 30 day exchanges, so there's no risk to you.
Select your band size along with cup size to find the best fit.
Bralette Conversion Chart
| FR/SP/BG | 80 | 85 | 90 | 95 |
| EU/CH/JP/ HK/KO |
65 | 70 | 75 | 80 |
| USA/UK/IN | 30 | 32 | 34 | 36 |
| AU/NZ | 8 | 10 | 12 | 14 |
| A |
|
XS | S | - |
| B |
|
S | M | - |
| C | S | M | M | - |
| D | - | M | L | L |
| DD | - | L | XL | XL |
| E | - | - | - | - |
Tip: If you are in between sizes or a size with two options, we usually recommend going the larger for extra comfort.
Measurements:
| XS | S | M | L | XL | |
| Ribcage cm | 65-80 cm / 29.5" | 70-85 cm /
|
75-90 cm / 33.5" | 80-95cm / 35.5" |
85-100cm / 35.5" |
For specific size advice please reach out to our customer care team, just like our bras, we're here to support you!
Unsure about your size? Visit our Size Guide for more information.
Bodysuit Conversion Chart
| FR/SP/BG | 80 | 85 | 90 | 95 |
| EU/CH/JP/ HK/KO |
65 | 70 | 75 | 80 |
| USA/UK/IN | 30 | 32 | 34 | 36 |
| AU/NZ | 8 | 10 | 12 | 14 |
| AA | - | XS | - | - |
| A | XS | XS | S | - |
| B | XS | S | S | - |
| C | M | M | L | |
| D | - | M | L | XL |
| DD | - | L | XL | XL |
| E | - | - | XL | - |
Tip: If you are in between sizes, we always recommend going up a size for extra comfort.
Measurements:
| XS | S | M | L | XL | |
| Ribcage cm | 75-80cm / 29.5" | 80-85cm / 31.5" | 85-90cm / 33.5" | 90-95cm / 35.5" | 90-95cm / 35.5" |
| Torso length cm | 55cm-65cm / 21-25" | 60cm-70cm / 23-27" | 65cm-75cm / 25-29" | 70cm-80cm / 27-31" | 75cm-85cm / 29-33" |
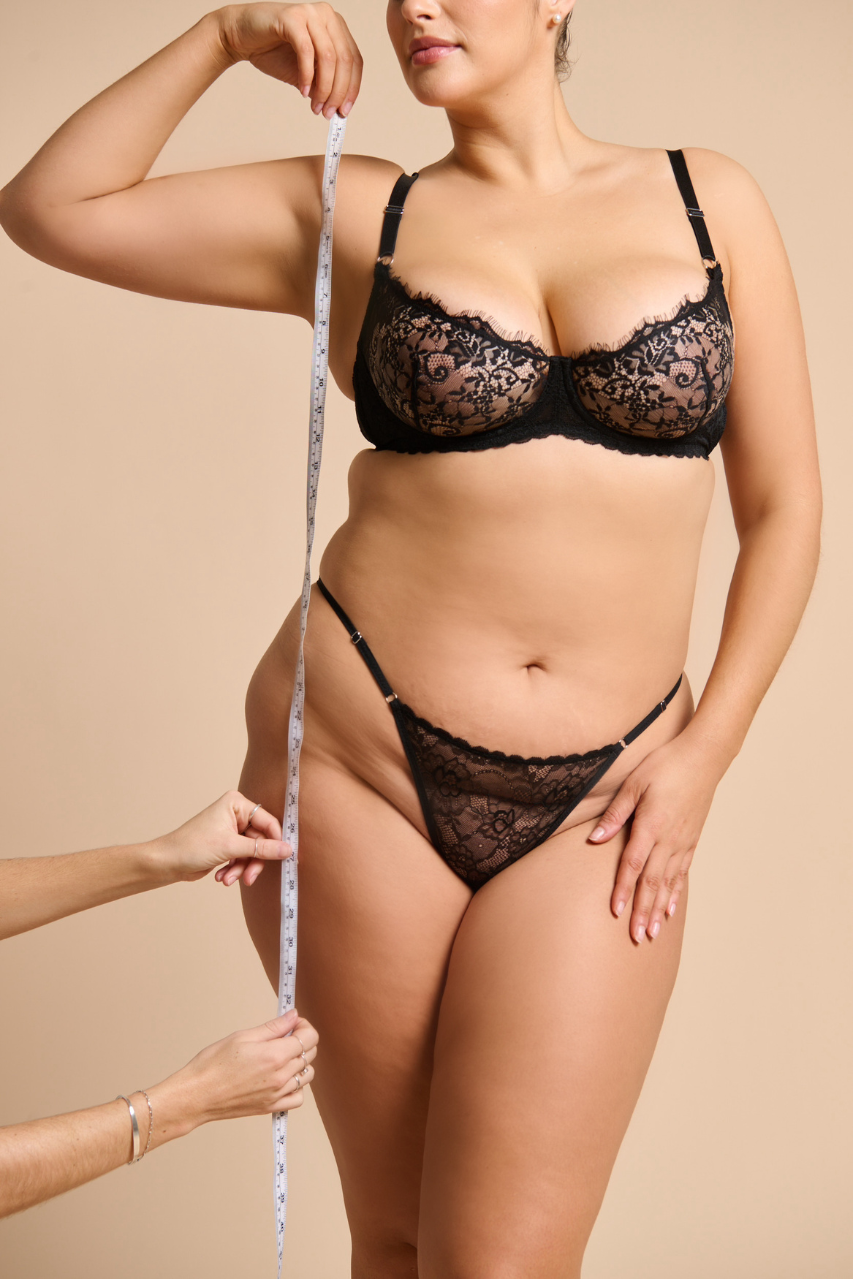
Underwear Conversion Chart
| EU | 34 | 36 | 38 | 40 | 42 | 44 | 46 |
| US | 2 | 4 | 6 | 8 | 10 | 12 | 14 |
| AU/UK | 6 | 8 | 10 | 12 | 14 | 16 | 18 |
| XS | S | M | L | XL | 2X | 3X | |
| Hips | 80cm / 31.5" | 90cm / 35.5" | 100cm / 39.4" | 110cm / 43.4" | 120cm / 47.3" | 130cm / 51" | 140cm / 55.1" |
Tip: If you are in between sizes, we always recommend going up a size for that extra comfort. We are true to sizes listed above but designs can vary slightly in fit.
For specific size advice please reach out to our customer care team, just like our bras, we're here to support you!
Please note that we do not accept back returns or exchanges on underwear bottoms due to hygiene regulations.
Unsure about your size?
We offer Australian customers easy 30 day exchanges, so there's no risk to you.
Sleepwear Conversion Chart
| EU | 34-36 | 36-38 | 38-40 | 40-42 | 42-44 | 44-46 | 46-48 |
| US | 2-4 | 4-6 | 6-8 | 8-10 | 10-12 | 12-14 | 14-16 |
| AU/UK | 6 | 8 | 10 | 12 | 14 | 16 | 18 |
| XS | S | M | L | XL | 2X | 3X | |
| Hips | 80cm / 31.5" | 90cm / 35.5" | 100cm / 39.4" | 110cm / 43.4" | 120cm / 47.3" | 130cm | 140cm |
| Waist | 58-63 cm / 22-24" | 63-68 cm / 24-27" | 68-73 cm / 27-29" | 73-78cm / 29-31" | 78-83cm / 31-33" |
83-88cm
|
*Our Jean Slips run slightly smaller than our other KTL slips
Unsure of your slip size or which fit to choose?
Our slips come in two styles designed for different levels of bust support and fit.
Non-underwire slips have a soft, unstructured bust for a relaxed, comfortable fit and can be chosen in your usual dress size.
Underwire slips feature built-in cups for added support, lift and shaping through the bust. For the best fit, we recommend checking your bust measurements and using the conversion chart below.
Underwire Slip Conversion Chart
| FR/SP/BG | 80 | 85 | 90 | 95 | 100 |
| EU/CH/JP/ HK/KO |
65 | 70 | 75 | 80 | 85 |
| USA/UK/IN | 30 | 32 | 34 | 36 | 38 |
| AU/NZ | 8 | 10 | 12 | 14 | 16 |
| AA | XS | ||||
| A | XS | XS | S | ||
| B | XS | S | M | ||
| C | S | M | M | L | |
| D | M | M | L |
XL
|
2X
|
| DD | 2S | L | XL |
XL
|
2X
|
| E | 2S | 2S |
XL
|
2X
|
3X |
| F | 2S | 2S | 2X |
2X
|
3X |
| G | 3X |
Tip: If you’re a dress size 8–10 with a DD–F cup, the 2S underwire slip is likely your best fit. If the body fits but the cups are too small in an M, or the cups fit but the body is too big in an L or XL, we recommend trying a 2S..
Slip Conversion Chart
| EU | 34-36 | 36-38 | 38-40 | 40-42 | 42-44 | 44-46 | 46-48 |
| US | 2-4 | 4-6 | 6-8 | 8-10 | 10-12 | 12-14 | 14-16 |
| AU/UK | 6 | 8 | 10 | 12 | 14 | 16 | 18 |
| XS | S | M | L | XL | 2X | 3X | |
| Hips | 80cm / 31.5" | 90cm / 35.5" | 100cm / 39.4" | 110cm / 43.4" | 120cm / 47.3" | 130cm | 140cm |
| Waist | 58-63 cm / 22-24" | 63-68 cm / 24-27" | 68-73 cm / 27-29" | 73-78cm / 29-31" | 78-83cm / 31-33" |
83-88cm
|
For specific size advice please reach out to our customer care team, just like our bras, we're here to support you!